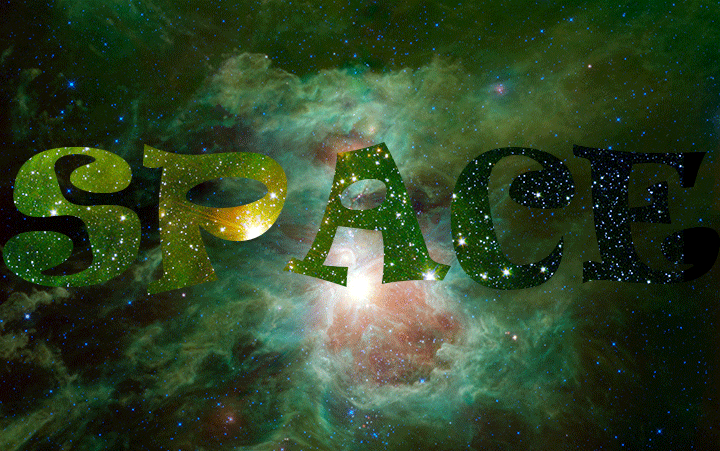
1. Get picture of Space Background (Orion Nebula)
2. Type "SPACE" in, move it to the center of the screen, change font to Ravie.
3. Find another image of space, save it, and copy it to another document.
4. Move the second image over the text layer of the original document using the move tool.
5. Scale the second image to a size larger than the first (Edit -> Transform)
6. Create a clipping mask (Alt+Cntrl+G)
7. To create the frame animation, make duplicates of the text and its clipping mask (at least 3 or 4 different layers of text and clipping mask)
8. Go to each frame and move the second space image a little further to the right each time
9. Go to Windows -> Timeline -> Frame Animation to create a frame animation
10. Hide all the layers except for the first layer of text and clipping mask (as well as the background) for the first frame
11. For the second frame, hide the first layer of text and clipping mask and unhide the second layer.
12. Continue this process until you have made a frame for each layer of a clipping mask.
13. Then, going to the second to last frame, create a new frame, and move it to the end of the frame animation.
14. Repeat this process for all frames except the first.
15. Set the frame delay to 0.1 seconds.
16. Save for web.
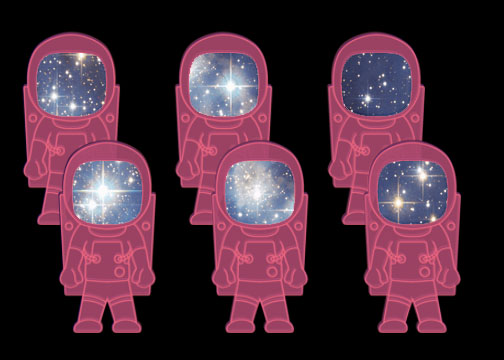
1. Obtain a clip-art style picture of astronauts with a transparent background and black outlines
2. Open the picture in Photoshop
3. Select the color range of the outline by Select -> Color Range
4. Copy into a new layer (Cntrl. + J)
5. Go back to the original layer, select the entire thing, and Edit -> Fill white
6. Select an area of the astronaut and go to Edit -> Define Brush Preset to make a brush
7. Open a new 7 x 5 window.
8. Make the background black (Cntrl. + Backspace if the background is black; Alt. + Backspace if the foreground is black)
9. Select the brush tool and choose the new brush of the astronaut, and make the brush size about 1/3 the height of the window
10. Going to Brush Presets, change the spacing of the brush to 159% or around that number
11. Change the foreground color to a shade of gray
12. Draw a straight line of astronauts (Shift + Draw for straight lines)
13. Change the foreground color to a darker blue and draw another line of astronauts over the initial one
14. Repeat step 13 with a pinkish color
15. Select the visor/mask of each astronaut using the Magic Wand Tool
16. Edit -> Fill white
17. Copy the layer of the first line of astronauts (Cntrl. + J)
18. Move the second layer a little higher and to the left.
19. Move the first line of astronauts above the second line
20. Erase the portion of the astronaut in each visor
21. Copy each of the visors of the astronauts into a separate layer
22. Get an image of stars
23. Open the image in Photoshop and move it to the window with the astronauts in a new layer
24. Create a clipping mask with the first visor in a new layer and the picture of stars (Cntrl. + Alt. + G)
25. Copy the layer containing the stars and create a clipping mask for each visor using step 24
26. Save as a JPEG image.
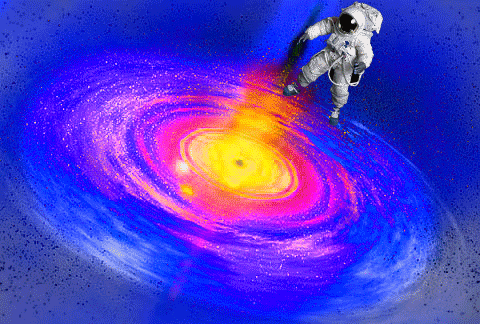
1, Obtain a picture of a black hole
2. Open the picture in Photoshop
3. Use the dodge tool around the edges and the interior of the black hole to make it stand out from the rest of the picture.
4. Copy the layer (Cntrl. + J)
5. Render difference clouds on the second layer (Filter -> Render -> Difference Cloods)
6. Going back to the first black hole layer, copy it again into a new layer.
7. Repeat step 6 for the layer with the difference clouds
8. Going back to the copy of the first black hole layer, use Cntrl. + I to invert the colors.
9. Repeat step 8 for the black hole layer with difference clouds.
10. Find a picture of an astronaut and open it in Photoshop.
11. Using the pen tool, select the astronaut portion of the image.
12. Copy that portion into a new layer.
13. Drag the image of the astronaut to the other Photoshop window.
14. Position, scale, and rotate the astronaut using the transform tools (Edit -> Transform)
15. Copy that initial astronaut into a new layer (Cntrl. + J)
16. Use the smudge tool to simulate the spaghetti-ficaton of an object entering a black hole.
17. Eventually, over a course of eight layers, make the astronaut so spaghettified that he disappears into the center of the black hole.
18. Open a timeline, and create a frame animation (Windows -> Timeline)
19. For the first frame, choose the first layer of full astronaut and the first black hole layer.
20. For the second frame, choose the second layer of the astronaut (that has been partially spaghettified) and the black hole layer with the difference clouds.
22. Continue to do this for each layer of astronaut present: create a new frame, choose the xth astronaut layer, and one of the black hole layers until the desired affect of a disco-esque black hole is formed.
23. Make sure the frame delay is set to 0.
24. Save for web.
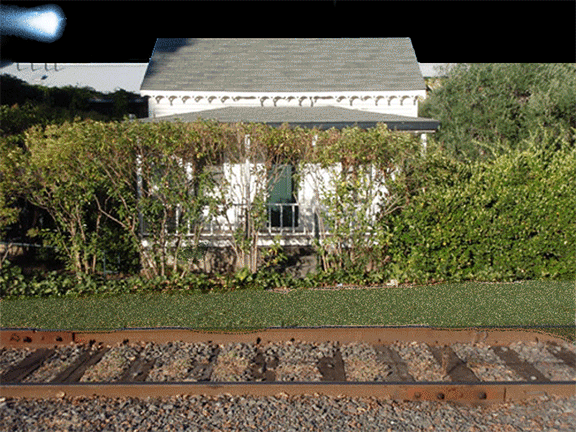
This visual was inspired by Naomi Shihab Nye's Poem "Trying to Name What Doesn't Change" and my poetry analysis groups interpretation of the poem as the track of life being able to shift and change and the train taking a different life along with it each time.
1. Obtain a picture of train tracks going sideways that has a house in the background.
2. Open the image in Photoshop, and make the image a reasonable size and resolution (Image -> Image Size)
3. Change the foreground color to a grassy-green
4. Select the brush tool, and go to brush presets.
5. Going under scattering, change the scattering to 1000% and change the Count Jitter to a reasonable number.
6. Change the spacing a little bit
7. Select the area between the house and the railroad tracks, and use the brush tool to paint in that area with a little texture to resemble grass / "spidery weeds"
8. Find an image of a train from a profile perspective.
9. Select the image of the train using either the quick selection tool or the pen tool (for the latter, have fun!!)
10. Move the image of the train to the other Photoshop window.
11. Use the transform tools to size the train
12. In one layer, move the train completely off the screen.
13. Copy that layer and move the train a little to the right each frame
14. After the fourth window of the train appears, make the train accelerate by moving in more across the screen each time.
15. Repeat steps 13 and 14 until the train in completely off the screen in a total of 30 layers
16. Create a frame animation (Windows -> Timeline)
17. For the first frame, only show the first layer, for the second frame, show the second layer, etc.
18. Repeat step 17 for all 30 frames.
19. Select those 30 frames in the frame animations
20. Press the button Duplicate Selected Frames twice for a total of 90 frames
21. Find pictures of one people such that their face and part of their torso is showing.
22. Open that image in Photoshop, and make any necessary edits (i.e., get rid of the background)
23. Drag that image of the face to the other Photoshop window
24. Using the transform controls, change the size of the face so that it fits in a window
25. When the second window of the train appears (even partially), put the face in the window (as much as is showing)
26. Move the face along with the second window of the train as the latter moves across the screen
27. When the train window disappears, make the face disappear
28. Again in the first 30 frames, select the sky (appears blue)
29. Use the rectangular marquee tool to select that area of the sky.
30. Cntrl. + Alt / Backspace (depending on if black is your foreground color or background color respectively)
31. Obtain a picture of a comet
32. Open the picture in Photoshop, and make any necessary edits
33. Use the pen tool to select the comet, and copy it into a new layer (Cntrl. + J)
34. Move the comet to the other Photoshop window
35. Using the transform tools, re-size the comet until it fits in the black portion of the sky
36. Animate the comet to move along with the train
37. Obtain a picture of a second face, open it in Photoshop.
38. Make any necessary edits (i.e., use the pen tool to select the face and part of the torso)
39. Move that face to the other Photoshop window, and re-size the image to the size of a train window.
40. Duplicate that face twice using Cntrl. + J, and use the eraser tool to erase a portion of the face so that as the window the face is in comes onto the screen, it resembles the act of a person popping up.
41. Obtain another face, and repeat steps 37 - 40, but set those faces aside for now; they will be a part of the third passing of the train.
42. Find the image of a rose on fire, open in Photoshop, and make any edits... you know the drill
43. Move the image of the rose to the other Photoshop window, and put it under every window that the second person's face will pop up in.
44. Put the second face in random windows and make it go through the animation of popping up, one layer at a time
45. For the third set of frames, obtain a picture of a cat, and open in Photoshop to make any necessary edits (or not, because in actuality, it's not necessary)
46. Make the cat appear (or fall, if you so desire) onto the tracks, and use the clone stamp tool to go around the edges of the cat to make the surroundings return to their proper setting.
47. When the first set of wheels goes over the cat, make the third face (from step 41) pop up
48. Do the same for the second set of wheels.
49. Save for web
50. And that is #ggnoreezlikefreezy
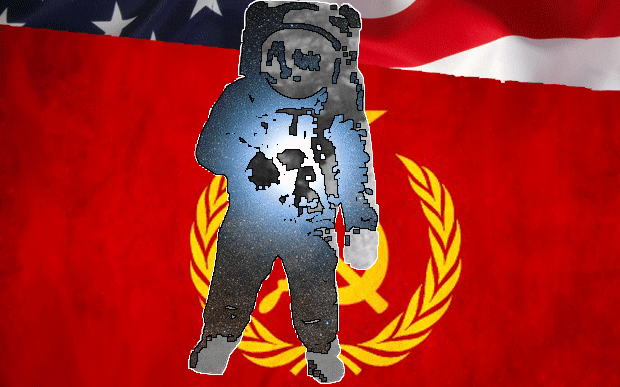
So, I just realized that no one was actually doing a step-by-step tutorial of their projects right about here, so all the other tutorials will remain, but in others, I'll just explain what I did. So this project represents the space race between the US and the Soviet Union. A picture of an astronaut on the moon was taken, and the threshold tool was used to give a pretty fabulous effect. Since threshold made the image black and white, I selected the color range of white and used Cntrl. + J to copy it into a new layer and did the same for black. I then went and copied each of those layers once each. Taking pictures of the surface of the Earth over Mexico, the moon surface, Europa's surface, and a random star (Alpha Centaurii), I created clipping masks behind each of those layers and merged them with the threshold layer of either black or white. I also stroked the edges around both the entire astronaut and between the two clipping masks. For the background, I used another clipping mask with the surface of the moon being selected to make the USSR flag a clipping mask behind it, and the space around the moon was a clipping mask of the US flag, clearly demonstrating how the Soviet Union did not win the space race, because that would clearly be noteworthy of epic proportions. I then animated the image to switch between the clipping masks for a pretty rad effect (or is it affect?)
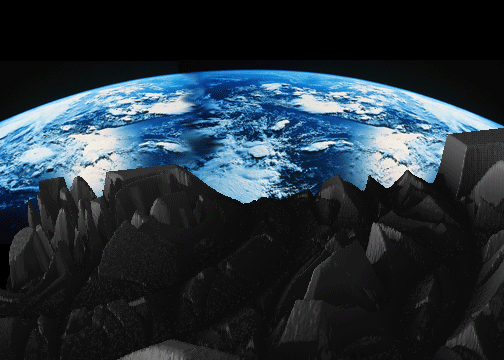
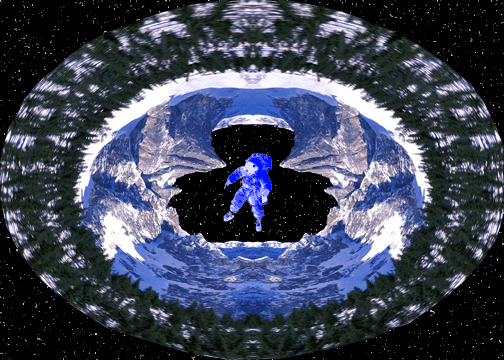
For this piece that sorta replicates the surface of the moon, open a blank Photoshop document. Selecting the gradient tool (and changing the option to darken), and make a gradient of gray, black, and gray. Many circular gradients were put on a black Photoshop document and then depth mapped to a one sided plane. That was rotated horizontally, and the light intensity, angle, opacity, reflectiveness, and bump(-iness) were changed so that the surfaced resembled that of a moon / planet. A picture of Earth was put behind the surface (since the angles of the Earth weren't perfect, some techniques from the Tiny Planet were used to make it normal. A picture of an astronaut was obtained, isolated, converted into a postcard, and made to pop up and down behind the surface of the moon / planet but in front of the Earth.
| project7.gif |
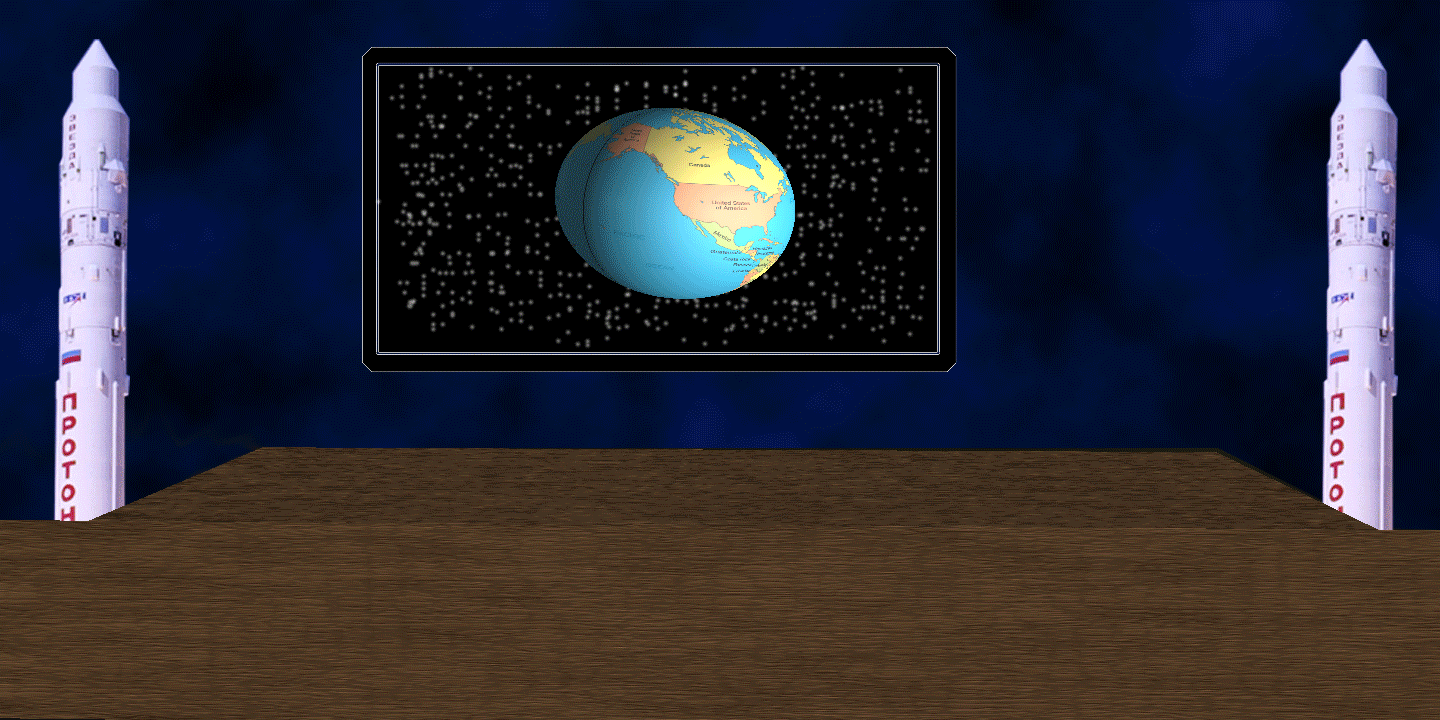
This project was a pretty large project (thus, it could not be uploaded), and involved something similar to the scene. A large, cube was created and just the front face was expanded to encompass the length of the window and not the top or the sides (for reasons explained later). The surface texture of the cube was changed to the wood preset found in Photoshop 3-D, to make the object look like a wooden stage. Then, something resembling a TV screen was created using the rectangular marquee tool, and stroking the outside of the screen with both a thin white stroke and a thick black stroke. Using the brush tool, a starfield was created on the TV screen. Then, a horizontal map of the Earth was obtained (if I had time, I would find a better one without the black on the edges), wrapped around a sphere, and the placed on the screen. To create the first part of the animation, the sphere was rotated around (again, if I had time, I would put Earth on its axis) the way it would be shown to spin. Then, a picture of a rocket was obtained, isolated, and put into the animation of Earth spinning so that it would seem to be taking off as Earth spun (the rocket was duplicated and flipped horizontally so that it would be flying in the opposite angle) and was created into multiple post cards. Additionally, as the rockets took off, images of explosions were obtained and isolated to put underneath the rockets to make the launch seem more realistic with fire and explosions. Finally, the transparent background was filled in with black and difference clouds were rendered on to the background. The effect is very comical. However, if I had time, I would make the launch and the Earth spinning much smoother.
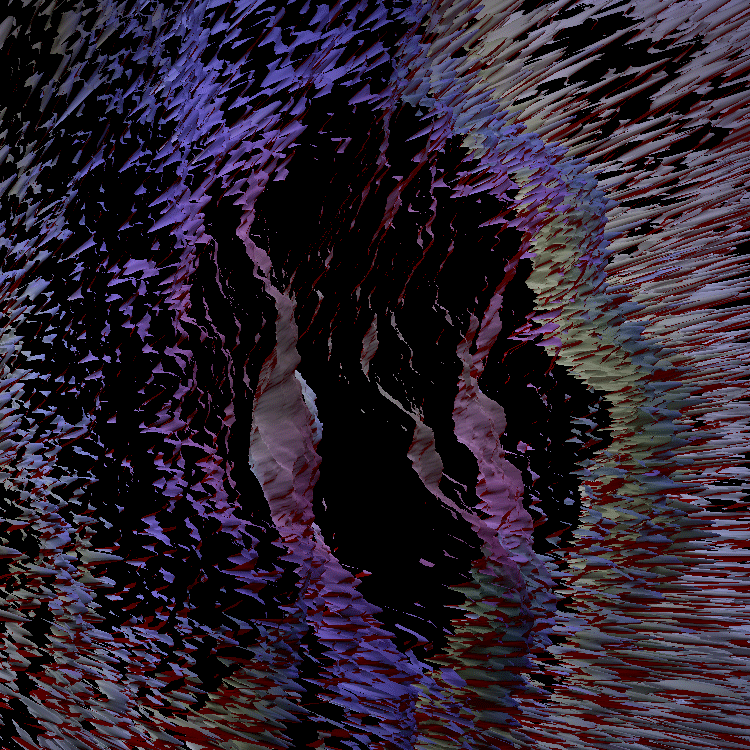
This project is like a random floating colorful asteroid in the middle of space. An image of a star was obtained, then the colors were flipped and difference clouds were rendered. The Tiny Planet effect was used in reverse (Polar Coordinates to Rectangular Coordinates) and filters were put on certain parts of the resulting image, that was thence depth mapped to a one sided plane. The opacity and the bumpiness was changed to give a cooler effect, but the main part of this project is the placement and the color of the light sources that caused a rapid color change while the asteroid spun around. On the initial side of the asteroid, a navy blue / black light source was used, and remained until the asteroid completely rotated. However, on the front side of the asteroid surface that was spiky and had a sort of mountain / volcano range, the light color was changed to red, so that when that part of the image was viewed from specific angles, the image would appear red. Then, an animation was created showed all the different angles of the asteroid and how the light color changed as it spun around.
1. Open a blank Photoshop document
2. Make the background black (Cntrl. + Alt / Backspace or Edit -> Fill)
3. Setting the foreground color as white, go to Filter -> Filter Gallery
4. Go to Sketch -> Torn Edges, max out the Image Balance and Smoothness but set the Contrast to 21.
5. Obtain a picture of a mountain range
6. Open the image in Photoshop, and make any necessary adjustments
7. Use Filter -> Distort -> Polar Coordinates to create a "Tiny Planet" effect
8. Select the left half of the image using the rectangular marquee tool.
9. Copy that half into a new layer
10. Flip the image horizontally (Edit -> Transform -> Flip Horizontal)
11. Drag that half of the image to the other side of the window so that you have a mirror image
12. Merge the two layers (Cntrl. + E)
13. Using the pen tool, select the exterior of the "Tiny Planet"
14. Using Cntrl. + J, copy the selection into a new layer
15. Using the Move Tool, move the Tiny Planet to the starfield previously created
16. Re-size the Tiny Planet so that it fits in the starfield.
17. Obtain a picture of astronaut
Optional Steps 18 - 20: Create a Vector Portrait
18. Select a feature of the astronaut (i.e., the visor, leg straps, shoes, etc.) using the pen tool
19. Copy that selection into a new layer, and give it a color (Edit -> Fill)
20. Repeat steps 18 and 19 for every distinct part of the astronaut
21. De-saturate the image (Cntrl. + Shift + U)
22. Use Posterization on the image (Image -> Adjustments -> Posterize) and select 4 levels
23. Move the image of the astronaut to the star field on top of the middle of the Tiny Planet
24. Moving back to the Tiny Planet Layer, using either the pen tool or the magic wand tool, select the middle portion of the tiny planet, and delete it to allow the starfield behind to show through
25. Moving back to the astronaut layer, select each color that makes up the Posterized image (i.e., white, light gray, dark gray, black) individually and copy it into a new layer
26. Duplicate the layers with a specific individual color range one time
27. Going to the first set of color ranges, fill them with varying shades of red, with the innermost part being the brightest red and the outermost part being the lightest red
28. Going to the second set of color ranges, fill them with varying shades of blue, with the innermost part being the lightest blue and the outermost part being the brightest blue
29. Create a frame animation (Windows -> Timeline / Animation)
30. Selecting all the blue layers for the first frame, make the second frame replace the outermost blue layer with the outermost red layer
31. Make the third frame replace the 3rd outermost layer of blue with red, and continue
32. When the entire astronaut is red, make the innermost layer blue instead of red, and continue outward until the entire astronaut is blue
33. Save for web
